# Mở đầu:
Trong quá trình phát triển các ứng dụng iOS việc sử dụng các resources như images , font , localization khá đơn giản - chúng ta chỉ việc kéo thả, khai báo các resource đó vào project, sau đó gọi các đối tượng bằng việc init với string ứng với tên của các resources đó.
Tuy nhiên với việc dùng string để gọi đến các đối tượng tiềm ẩn một số sai sót, khi ta gõ sai string hoặc khi gọi đến các resources đã bị xoá, lúc này thì quá trình compile không thể phát hiện được lỗi dẫn đến crash ứng dụng, hiển thị sai resources…

Với thư viện R.Swift chúng ta có thể dễ dàng giải quyết vấn đề trên.
# R.swift:
R.Swift là một thư viện open source hỗ trợ generate ra các resources có trong source code trong quá trình compile, hỗ trợ autocompleted giúp chúng ta có thể dễ dàng truy vấn, cũng như tránh các lỗi khi sử dụng sai string hoặc sử dụng resource đã bị xoá. Ngoài resource ra thì R.swift còn hỗ trợ các string identifier như segue, storyboards, reuseable cell, nibs…
# Install:
Chúng ta install qua CocoaPods:
1
pod 'R.swift'
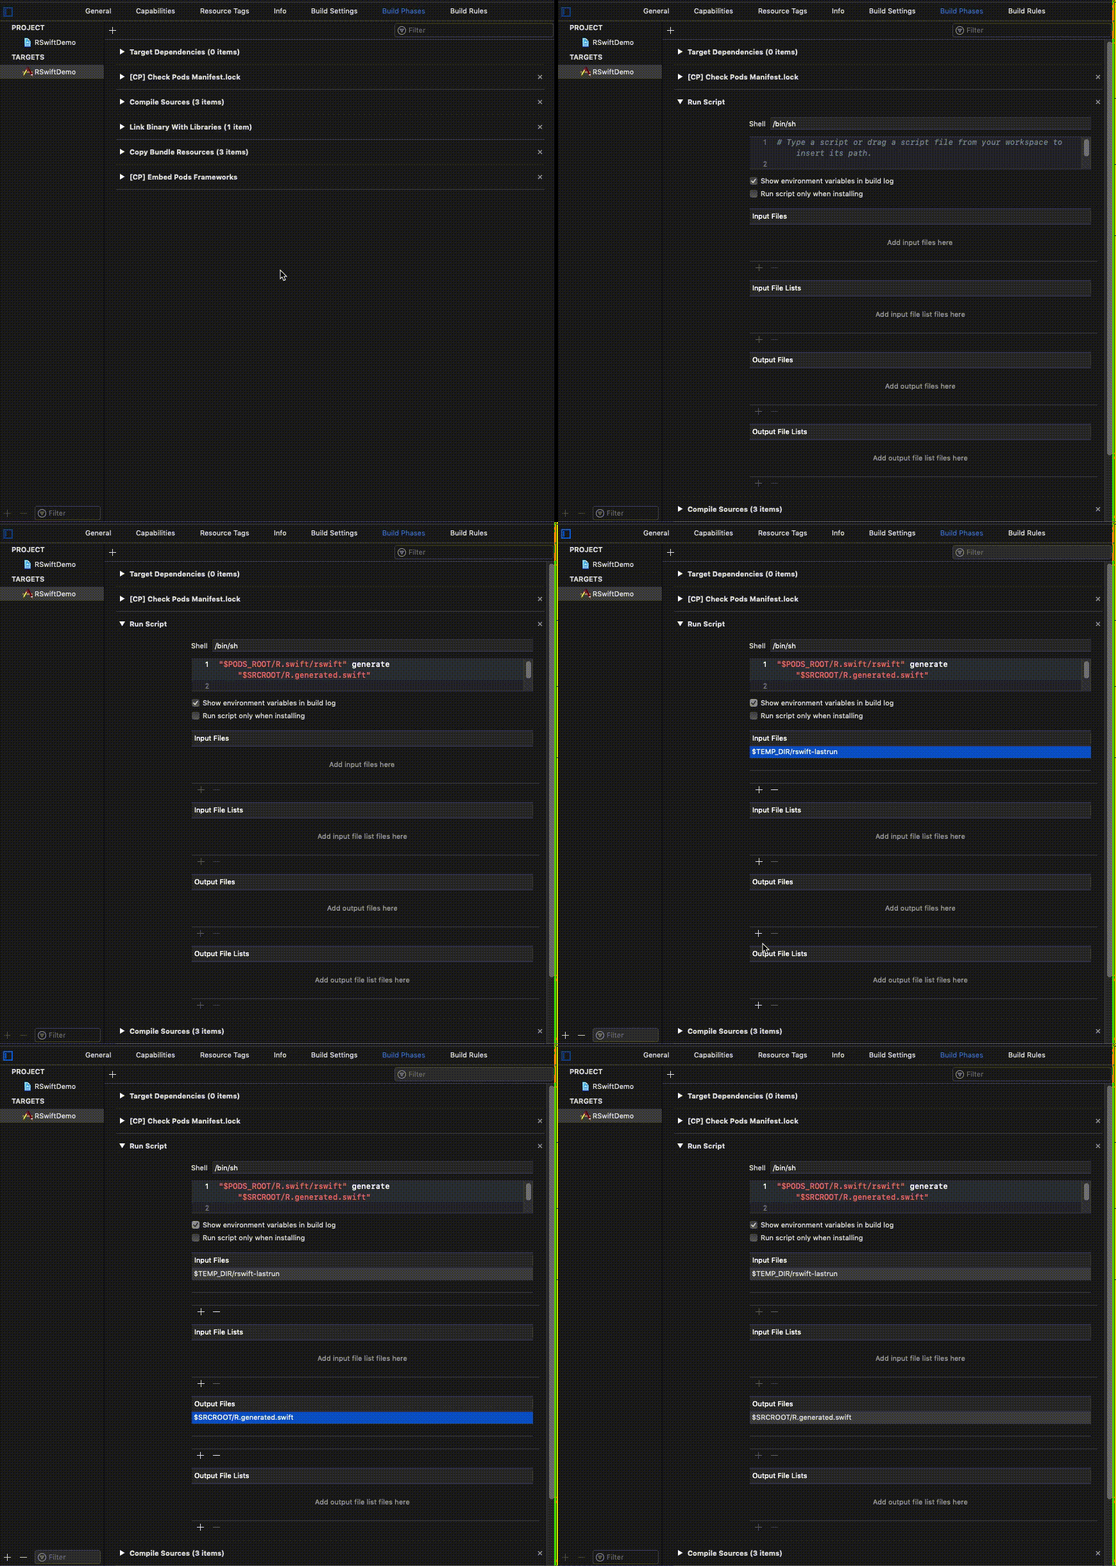
Trong TARGET của project chọn Build Phases => click icon “+” thêm New Run Script Phase
Kéo New Run Script Phase của bạn mới thêm ở step 2 lên nằm giữa 2 Scripts Compile Sources và Check Pods Manifest.lock. Copy đoạn sau vào script mới thêm: “$PODS_ROOT/R.swift/rswift” generate “$SRCROOT/R.generated.swift”
Thêm $TEMP_DIR/rswift-lastrun vào “Input Files” và $SRCROOT/R.generated.swift vào “Output Files” của script tạo ở step 2.
Build project sẽ thấy file R.generated.swift trong Finder của source, drag file đó vào project và uncheck Copy items if needed

# Sử dụng:
1. Images:
Vanila:1
2let settingsIcon = UIImage(named: "settings-icon")
let gradientBackground = UIImage(named: "gradient.jpg")
R.swift:1
2let settingsIcon = R.image.settingsIcon()
let gradientBackground = R.image.gradientJpg()
Autocomplete:
2. Fonts:
Vanila:1
2let jsonURL = Bundle.main.url(forResource: "seed-data", withExtension: "json")
let jsonPath = Bundle.main.path(forResource: "seed-data", ofType: "json")
R.swift:1
2let jsonURL = R.file.seedDataJson()
let jsonPath = R.file.seedDataJson.path()
3. Localized
Vanila:1
2let welcomeMessage = NSLocalizedString("welcome.message", comment: "")
let settingsTitle = NSLocalizedString("title", tableName: "Settings", comment: "")
R.swift:1
2let welcomeMessage = R.string.localizable.welcomeMessage()
let settingsTitle = R.string.settings.title()
4.Storyboards
Vanila:1
2
3let storyboard = UIStoryboard(name: "Main", bundle: nil)
let initialTabBarController = storyboard.instantiateInitialViewController() as? UITabBarController
let settingsController = storyboard.instantiateViewController(withIdentifier: "settingsController") as? SettingsController
R.swift:1
2
3let storyboard = R.storyboard.main()
let initialTabBarController = R.storyboard.main.initialViewController()
let settingsController = R.storyboard.main.settingsController()
5. Segues
Vanila:1
performSegue(withIdentifier: "openSettings", sender: self)
R.swift:1
performSegue(withIdentifier: R.segue.overviewController.openSettings, sender: self)
6. Nibs
Vanila:1
2
3
4
5
6let nameOfNib = "CustomView"
let customViewNib = UINib(nibName: "CustomView", bundle: nil)
let rootViews = customViewNib.instantiate(withOwner: nil, options: nil)
let customView = rootViews[0] as? CustomView
let viewControllerWithNib = CustomViewController(nibName: "CustomView", bundle: nil)
R.swift:1
2
3
4
5
6let nameOfNib = R.nib.customView.name
let customViewNib = R.nib.customView()
let rootViews = R.nib.customView.instantiate(withOwner: nil)
let customView = R.nib.customView.firstView(owner: nil)
let viewControllerWithNib = CustomViewController(nib: R.nib.customView)
7. Reusable Cell
Vanila:1
tableView.register(textCellNib, forCellReuseIdentifier: "TextCellIdentifier")
R.swift:1
tableView.register(R.nib.textCell)
…
# Kết:
Mặc dù hơi cồng kềnh trong việc cài đặt nhưng về lâu dài R.Swift sẽ giúp việc quản lý resources trong project được rõ ràng hơn, nhanh hơn với autocompleted, cũng như tránh được những lỗi như quản lý resources bằng string thông thường.